Homelab Build Log
Engineering Infra Docker
Background
I’d been running a side project on the AWS free tier, and the goodbye came out of nowhere. I’d already been thinking about moving off AWS to cut server costs, considering AWS Lambda or some other cloud service, but running out of free tier credits faster than expected forced my hand.
Then it hit me: every developer should build a home server at least once — there’s a certain romance to it. I happened to have an idle Windows laptop sitting at home, so instead of moving to another cloud provider, I decided to build a home server.
The Final Setup
- OS: Ubuntu Server 26.04 LTS
- External exposure: Cloudflare Tunnel
- SSH access: Tailscale
- Deployment: GitHub Actions → build on Docker Hub → connect via Tailscale → deploy
[Visitor] → Cloudflare (DNS) → cloudflared container (Cloudflare Tunnel) → nginx container → each service container
[GitHub Actions] → Tailscale private network → SSH → home server
Overall traffic flow
Without any port forwarding, the app is exposed externally only through Cloudflare Tunnel, and SSH access only goes through the Tailscale private network.
Building It
Installing Ubuntu Server
Windows seemed inconvenient for a home server, and honestly, Linux just felt more fitting for the job. So I wiped Windows and installed Ubuntu Server instead.
First, I grabbed the Ubuntu Server 26.04 LTS ISO from ubuntu.com/download/server and made a bootable USB with Rufus on my Windows laptop.
With the USB plugged in, I powered on the laptop and hit F2 to enter the BIOS, where I
- disabled Secure Boot
- changed Boot Priority so the USB boots first
After saving and rebooting, the Ubuntu installer came up from the USB, and I just followed the on-screen instructions to install Ubuntu.
Basic Server Setup
Installing the SSH daemon
sudo apt update
sudo apt install openssh-server -y
sudo systemctl enable --now ssh
systemctl status ssh   # confirm active (running)
Allowing SSH through the firewall
I planned to lock SSH down to Tailscale-only access later, but for now I opened it up for the initial connection.
sudo ufw allow OpenSSH
After checking the home server’s IP with ip a, I connected from my main MacBook with ssh myaccount@homeserverIP and did the rest of the work from there.
System update
sudo apt update && sudo apt upgrade -y
sudo reboot
Laptop power management
Since I was using a laptop as a server, I needed it to not go to sleep when the lid was closed.
sudo vim /etc/systemd/logind.conf
HandleLidSwitch=ignore
HandleLidSwitchDocked=ignore
HandleLidSwitchExternalPower=ignore
sudo systemctl mask sleep.target suspend.target hibernate.target hybrid-sleep.target
sudo systemctl restart systemd-logind
Switching to SSH key authentication
I generated an SSH key pair on my main MacBook and sent the public key to the home server.
ssh-keygen -t ed25519 -f ~/.ssh/<key_name> -C "<key_comment>"
ssh-copy-id -i ~/.ssh/<key_name>.pub myaccount@homeserverIP
ssh-copy-id only works with an account that can still log in with a password.
Disabling SSH password login
sudo vim /etc/ssh/sshd_config
PasswordAuthentication no
Change the value
sudo sshd -t   # syntax check
sudo systemctl restart ssh
Installing Docker
curl -fsSL https://get.docker.com | sh
sudo usermod -aG docker $USER
exit   # reconnect for docker group permissions to take effect
docker run hello-world
confirm installation
Connecting a Domain
I switched the nameservers of a domain I’d bought on Gabia over to Cloudflare, so Cloudflare could handle both DNS management and the Tunnel in one place.
In the Cloudflare dashboard, under Domains > Overview > Add domain, I registered the Gabia domain, removing every existing record when I did. Records need to be gone before Cloudflare Tunnel can later map this domain to a container on the home server.
Once that’s done, I also went back to Gabia and replaced the domain’s existing nameservers with the ones Cloudflare issued.
dig NS domainname @1.1.1.1
confirm the DNS change has propagated
Cloudflare Tunnel
I used this to expose the home server externally without any port forwarding.
- Cloudflare dashboard → Zero Trust > Networks > Connectors > Create a tunnel
- Chose Docker
- While setting up the tunnel, routed the Gabia domain to nginx
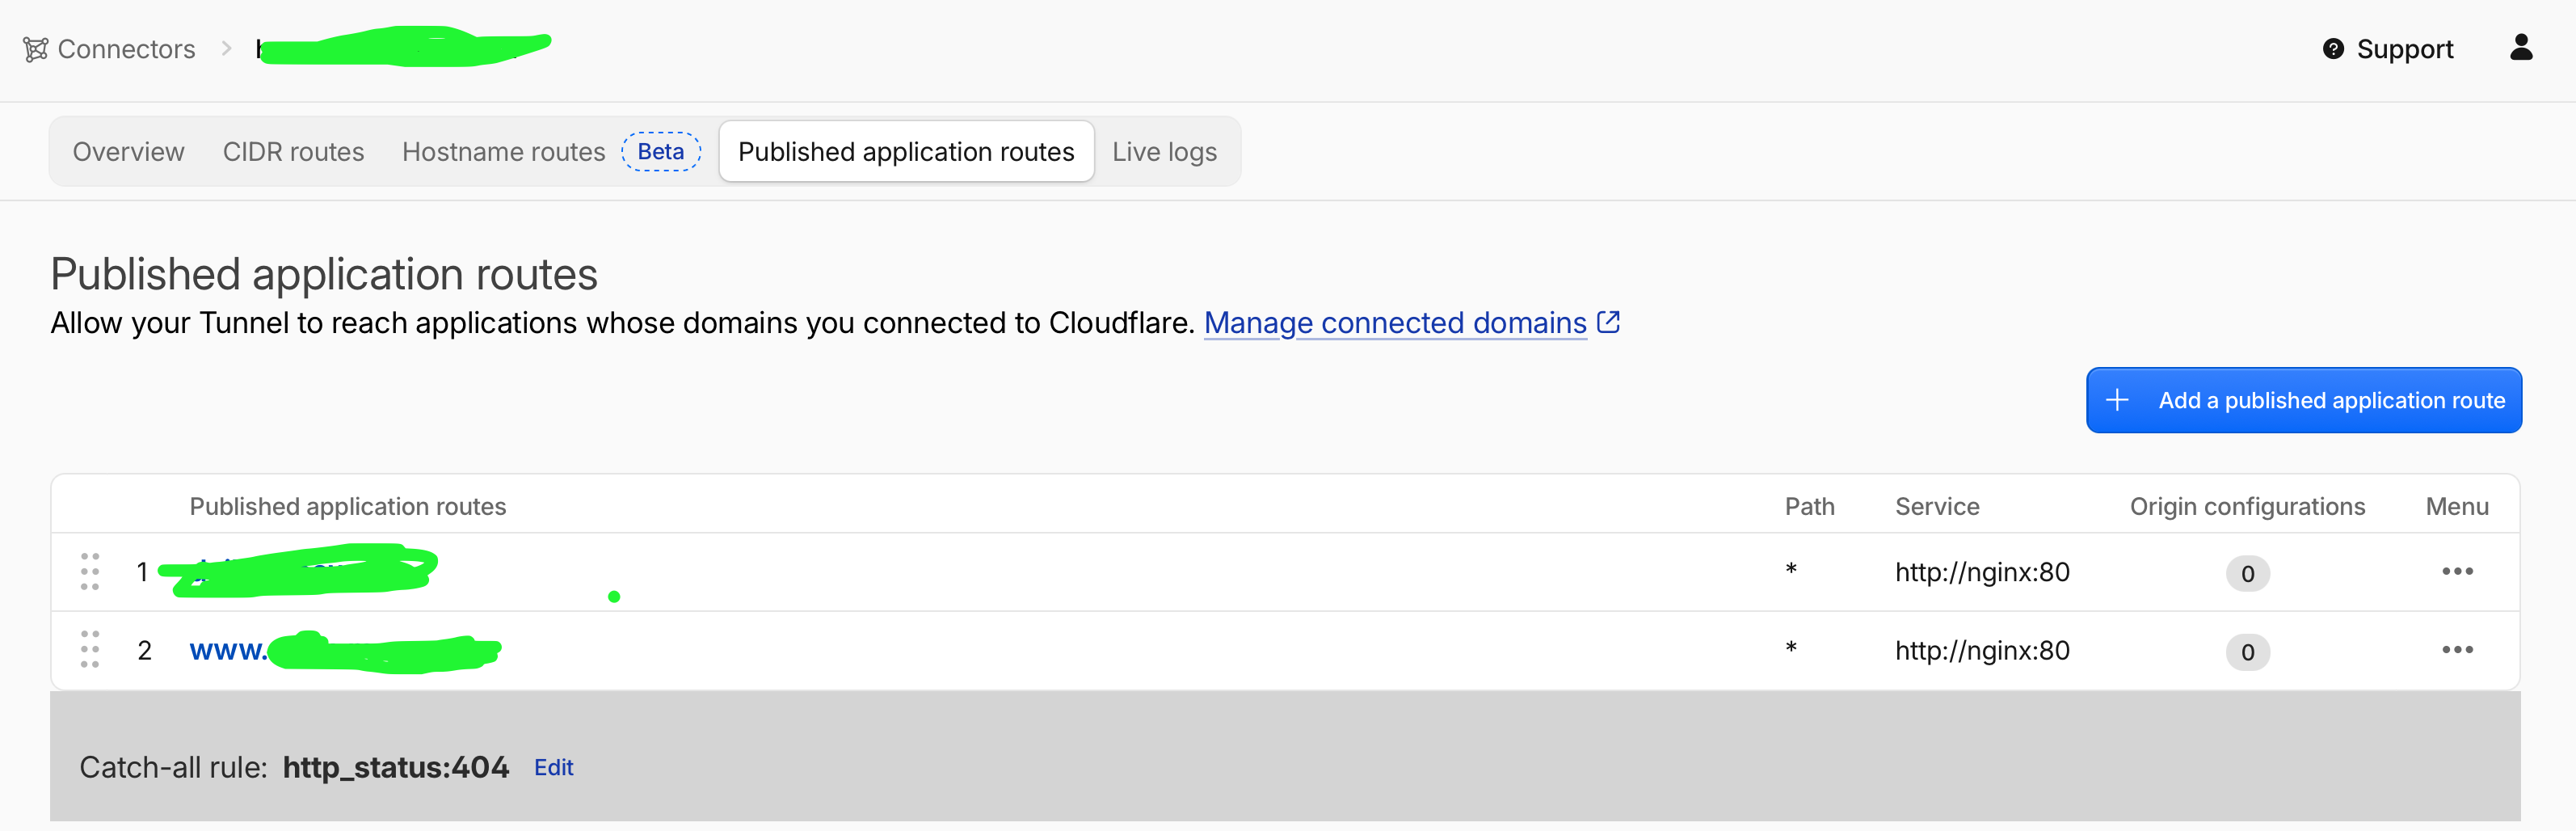
Cloudflare Tunnel connector setup
For the infrastructure pieces — the cloudflared service, nginx, and the Qdrant and MySQL services the app uses — I put them together in a single Docker Compose file and brought the containers up.
services:
  nginx:
    image: nginx:alpine
    container_name: nginx
    restart: unless-stopped
    volumes:
      - ./nginx/conf.d:/etc/nginx/conf.d:ro

  cloudflared:
      image: cloudflare/cloudflared:latest
      container_name: cloudflared
      restart: unless-stopped
      command: tunnel --no-autoupdate run
      environment:
        - TUNNEL_TOKEN=...

  qdrant:
    container_name: meow-qdrant
    image: qdrant/qdrant:latest
    restart: unless-stopped
    volumes:
      - qdrant_data:/qdrant/storage

  mysql:
    container_name: meow-mysql
    image: mysql:8.0
    restart: unless-stopped
    environment:
      MYSQL_ROOT_PASSWORD: ..
      MYSQL_DATABASE: ..
      MYSQL_USER: ..
      MYSQL_PASSWORD: ..
      MYSQL_CHARSET: utf8mb4
    command: --character-set-server=utf8mb4 --collation-server=utf8mb4_unicode_ci
    volumes:
      - mysql_data:/var/lib/mysql

networks:
  default:
    name: meow-network

volumes:
  qdrant_data:
  mysql_data:
docker-compose.yml
In ~/nginx/conf.d/default.conf, I set up nginx to proxy requests to each application.
server {
    listen 80;
    server_name _;

    # Streamlit admin UI (accessed by humans through a browser, has its own password auth)
    # It's served with baseUrlPath=/admin, so the prefix is kept and passed through as-is
    location /admin/ {
        proxy_pass http://meow-streamlit:8501;
        proxy_set_header Host $host;
        proxy_set_header X-Real-IP $remote_addr;
        proxy_set_header X-Forwarded-For $proxy_add_x_forwarded_for;
        proxy_set_header X-Forwarded-Proto $scheme;

        # Streamlit refreshes the page over WebSocket, so the upgrade headers are required
        proxy_http_version 1.1;
        proxy_set_header Upgrade $http_upgrade;
        proxy_set_header Connection "upgrade";
    }

    # FastAPI's admin REST API — blocked from external calls, only reachable from the meow-streamlit container
    # Internal calls (meow-streamlit → meow-content:8000) don't go through nginx, so this doesn't affect them
    location ~ ^/api/v1/admin(/|$) {
        deny all;
        return 403;
    }

    # everything else is the public API
    location / {
        proxy_pass http://meow-content:8000;
        proxy_set_header Host $host;
        proxy_set_header X-Real-IP $remote_addr;
        proxy_set_header X-Forwarded-For $proxy_add_x_forwarded_for;
        proxy_set_header X-Forwarded-Proto $scheme;
    }
}
nginx/conf.d/default.conf
Tailscale
I moved admin access inside a private network to tighten up security.
Installed Tailscale on the home server and logged in to join the private network.
curl -fsSL https://tailscale.com/install.sh | sh
sudo tailscale up
Did the same on my main MacBook, joining the same private network.
In the firewall, I kept only SSH access through the Tailscale interface and removed everything else.
sudo ufw status numbered
Anywhere on tailscale0        ALLOW IN
Anywhere (v6) on tailscale0   ALLOW IN
keep only these two, remove the rest
sudo ufw delete N # delete from the highest number down, since numbers shift after each deletion
Running tailscale ip -4 on the home server shows its Tailscale IP, which only resolves inside this tailnet. From here on, I connect with ssh myaccount@tailscale_ip instead of the old IP.
I also added tagOwners to the Tailscale policy JSON. Devices that join the Tailscale private network via an OAuth client aren’t human, so they need a tag to be allowed into the tailnet. GitHub Actions runners are throwaway machines spun up fresh each time, so they join via an OAuth client — this is prep work for the CI/CD setup I’ll cover next.
{
  // ...
  "tagOwners": {
    "tag:ci": ["autogroup:admin"],
  },
}
only accounts with admin rights can issue this tag
Setting Up CI/CD with GitHub Actions
The overall flow looks like this:
push to main
  → (build-and-push) build Docker image → push to Docker Hub
  → (deploy) temporarily join the tailnet → SSH into the home server → pull the latest image & restart
Creating a dedicated deploy account
Create a deploy account on the home server, dedicated to deployments.
sudo useradd -m -s /bin/bash deploy
sudo usermod -aG docker deploy
Generating and transferring a dedicated deploy SSH key
Generate it on the MacBook, then send it to the home server.
ssh-keygen -t ed25519 -f ~/.ssh/<key_name> -C "<key_comment>"
scp ~/.ssh/<key_name>.pub <my_account>@<server_ip>:~/key.pub
The deploy account has no password, so ssh-copy-id (used earlier) won’t work here.
Registering the key with the deploy account
The public key I just scp’d over is sitting in my own account’s home directory for now — it has nothing to do with the deploy account yet. I need to register it in the deploy account’s authorized_keys before GitHub Actions can actually SSH in as deploy.
sudo mkdir -p /home/deploy/.ssh
sudo bash -c 'cat /home/<my_account>/key.pub >> /home/deploy/.ssh/authorized_keys'
sudo chown -R deploy:deploy /home/deploy/.ssh
sudo chmod 700 /home/deploy/.ssh
sudo chmod 600 /home/deploy/.ssh/authorized_keys
mkdir -p /home/deploy/.ssh: creates the.sshdirectory for the deploy accountcat ... >> authorized_keys: appends the public key I uploaded to my own account into the deploy account’sauthorized_keyschown -R deploy:deploy: hands ownership of everything created withsudoso far over to the deploy accountchmod 700 .ssh,chmod 600 authorized_keys: tightens the permissions
sshd is the SSH daemon — the server process that receives and handles incoming SSH connections. It got installed and started running in the background the moment I installed openssh-server. If the permissions on authorized_keys or its parent directories (.ssh, the home directory) grant write access to anyone other than the owner, sshd assumes the file might have been tampered with and refuses key authentication outright.
Linux permissions give the owner, group, and other three separate 3-bit blocks (rwx) for read/write/execute, and that’s what gets compressed into the number you pass to chmod.
chmod 700 .ssh
          owner group other
7   =     111   000   000   (rwx / --- / ---)

chmod 600 authorized_keys
          owner group other
6   =     110   000   000   (rw- / --- / ---)
For both 700 and 600, the group and other bits are 000. In other words, nobody but the deploy account (the owner) has any access at all to the .ssh directory or the authorized_keys file.
Creating a Tailscale OAuth client
- Tailscale console → settings > Trust credentials > + Credential
- OAuth > All scopes
- Grab the client ID and secret
Registering GitHub Secrets
DOCKERHUB_USERNAME/DOCKERHUB_TOKEN: Docker Hub authenticationTS_OAUTH_CLIENT_ID/TS_OAUTH_SECRET: Tailscale OAuth clientSSH_PRIVATE_KEY: the full contents ofcat ~/.ssh/<key_name>SERVER_TS_IP: the home server address fromtailscale ip -4ENV_FILE_CONTENT: the app’s.envcontents
main.yml
name: CI/CD Pipeline
on:
  push:
    branches: [ "main" ]
jobs:
  build-and-push:
    runs-on: ubuntu-latest

    steps:
    - name: Checkout code
      uses: actions/checkout@v4
    - name: Set up Python
      uses: actions/setup-python@v4
      with:
        python-version: '3.13'
    - name: Login to Docker Hub
      uses: docker/login-action@v3
      with:
        username: $
        password: $
    - name: Build and push Docker image
      uses: docker/build-push-action@v5
      with:
        context: .
        push: true
        tags: $/meow-content:latest

  deploy:
    needs: build-and-push
    runs-on: ubuntu-latest

    steps:
    - name: Checkout code
      uses: actions/checkout@v4

    - name: Connect to Tailscale
      uses: tailscale/github-action@v4
      with:
        oauth-client-id: $
        oauth-secret: $
        tags: tag:ci

    - name: Copy deploy compose file to homelab
      uses: appleboy/scp-action@v0.1.7
      with:
        host: $
        username: deploy
        key: $
        source: "docker-compose.app.yml"
        target: "~/meow-content/"

    - name: Deploy to homelab via SSH
      uses: appleboy/ssh-action@v1.0.3
      with:
        host: $
        username: deploy
        key: $
        script: |
          cd ~/meow-content

          echo "$" > .env.tmp

          DOCKERHUB_USERNAME=$ \
            docker compose -f docker-compose.app.yml pull

          DOCKERHUB_USERNAME=$ \
            docker compose -f docker-compose.app.yml up -d

          rm -f .env.tmp
Why I still need an SSH key even with Tailscale
Tailscale’s job is to open up the firewall layer so traffic can reach the home server at all. The SSH key’s job is to prove, once traffic has reached the server, that it’s allowed to log in as this account. They cover two different layers — “reachability” and “authentication” — so having one doesn’t let you skip the other.
Wrapping Up
Splitting external exposure off to Cloudflare Tunnel and admin access off to Tailscale means I never have to touch my router’s port forwarding settings, which feels a lot more secure. On top of that, I now get a server with far better specs than my old AWS free-tier instance, with no cost to worry about besides the electricity bill, running on a single laptop. But more than anything, I’m just glad I finally checked “build a home server” off my bucket list.